Monday 12 December 2016

How to Convert JPG, BMP, TIF, GIF and JPEG to MS Word using OCR Software

Computers produce two types of output, namely soft copy and hard copy. Hard copy is printed documents, a user sometimes needs to scan the documents to convert it into soft copy for editing or to attach it to an email.

Scanned documents are normally saved in a computer either as images or in portable document format (PDF). Image formats have the extension of JPG, GIF, and PNG. Though scanning avoids retyping of documents, making a couple of changes is tricky as one can opt to redo the entire typing of content which consumes much of time and efforts. Many are not aware of how to convert the documents and make it editable from any format using Optical Character Recognition software. It is a just one click tool used to convert images and PDF files to editable word format with accurate texts, spacing, and original formatting.

JPG to Word Converter is a software that can read and recognize text from images or scanned documents and convert it to text-based formats. It can convert text from BMP, PDF, TIF, and JPG in more than 40 supported languages back to its original language text, fonts, and styles. The JPG to Word output retains texts, tables, graphics, layout and logical structure in single or multi-page documents. The software is available on Softonic website =>Download it here and at the company website => Download it here.


The software corrects broken texts and characters, rotated, skewed and tilted images to better accuracy and recognition. Converted documents can be secured using password and watermark, this protection prevents users from viewing, copying or distributing the document. To carry out and enjoy the services of images to word conversion, find the best OCR online by searching for JPG to Word converter and download the software. Once downloaded, follow a couple of simple steps to install.


To Run The Software
» Double-click on the desktop icon, a simple user interface will open.
» From the left side of the program, select the image file to convert from your PC or scan it from a device connected to your PC.
» Choose the relevant output, which can be searchable PDF, Word, Text, HTML, and text-only PDF.
» Specify language input file like English, French, German, Spanish etc.
» Check the Auto Rotate and Auto Skew boxes to correct the rotation and skew of the JPG file if there is any.
» The input image preview window will show the input image on the right. Check on whether to view the converted file after conversion and choose a location.
» Hit the save button to convert the document.

When the conversion is complete, then you are able to change any text in the converted file. The ability of the software to digitize various file formats, many distinctive features and intuitive Graphical User Interface (GUI) are the reasons why customers and users of the program keep growing rapidly.


The advantages of the software is that once it has finished the conversion, you can find, edit or replace specific text in the converted Word file. And since the file is in text format, screen readers or speech synthesizers can be used to read the text from the file for the visual impaired.

Most OCR software works in the same manner, though you should by particular in selecting one, this is because there is a difference in quality and accuracy among those. Some are of low quality and produce a garbled output file with unrecognized character. This happens because of OCR accuracy of the software resulting in partial file conversion. JPEG to Word Converter by Soft solution has a high accuracy in file conversion with the support of different languages. JPEG to Word Converter solves all your converting needs and saves you that long and hectic process. It can convert JPEG, BMP, TIF, GIF and JPG files to not only in MS Word document but also in PDF, Doc, HTML and Text files simultaneously. The software is very easy to use and consist only single window so it won't irritate you to swapping around the screens.
And That's it


Sunday 16 October 2016

Huawei G Power 4000mah Full Specs & Price In Nigeria

First off, I must confess that I've never really been a fan to huawei mobile phones. You can talk of huawei modems but certainly not their mobile phones due to the high price tag. But a lot changed when I heard about their latest product; huawei G-power with 4000mAh specifications.

A mid range android device tagged "the power of sharing", running on android version 5.1 lollipop with mediatek chipset powered by a whooping 4,000mAh battery. Which is not all.

What caught my attention was the good battery life and it's fast charge features, the 13mp camera with a moderate 5.0 inch display that came with the phone. Huawei also made g-power a bang by including reverse charging. A feature that enable you charge other phones with it (serve as a power bank to other devices)

According to huawei, the battery can give upto 119 hours when playing music, 39 hours on call, 18 hours movies streaming and15 hours internet surfing.

Images Of Huawei G-power


Full Specs & Price Of Huawei G-Power Android MTK Device

Brand: Huawei
Name/Model: Huawei Y6 propro (G Power)
Availability: February 2016

Body & Display
Dimensions: XX x XX x 8.5 mm
Display: 5.0 inch
Screen Type: Full HD Capacitive
Resolution: 720 x 1280 pixels (293 ppi)
Keyboard: Touchscreen
Colors: Black, White, Gold
Cover casing: NA

Network
2G Network: GSM 850 / 900 / 1800 / 1900
3G Network: HSDPA 900 / 2100
4G Network: LTE
SIM: Dual
SIM Type: Micro sim

Platform/OS
OS : Android
Version: Lollipop 5.1
Processor : 1.3GHz 64bit Quad-core
Processor Name: Mediatek MT6735P
Graphic processor: Mali T720

Memory
Internal Memory/Rom: 16GB
External Memory: MicroSD, support up to 32GB
RAM: 2GB

Camera
Back camera: 13MP
Rear Camera Features: Autofocus, Led flash
Front: 5MP, fixed focus

Media/Sound
Music support: mp3, aac, aac+, eaac+, amr, wb-amr, midi
Surround Digital
Loudspeaker : Yes
Video Support: mpeg4, h.263, h.264
FM Radio: Yes
Audio port : 3.5mm jack

Connectivity
WIFI: Wi-Fi 802.11 b/g/n, WIFI hotspot, Wi-Fi direct
Bluetooth: Version 4.0
GPS: Yes
NFC: NA
USB: MicroUSB v2.0,
OTG: Yes

Sensors
Fingerprint sensor: No
Accelerometer: Yes
Gravity: Yes
Proximity sensor: Yes
Geomagnetic sensor: Yes

Battery & Price
Type: Li-Ion Battery
Capacity: 4,000mAh
Removable: NA
Active Standby: NA
Talk time: NA
Price: Available After Launch

Saturday 15 October 2016

SmallSeoTools A Must Tool For Every Blogger & Wanna Be Bloggers

If you own a site, blog or really want to own one someday, and you haven't visited/made use of SmallSeoTools. Then you're probably still a learner with no hope of becoming a PRO period.

Don't mind the hash word as its the simple truth except you've got alternatives like semrush and co. Small seo tool, is a must have seo optimization tool for every blogger. A tool that has got you covered in terms free seo evaluations. Let's you peep, and places you right in front of other top blogger's well kept secrets about their blogs.
small-seo-tools-services
small seo tool
Its services are Free and easy to use. You don't need to download or install any app. All you need do is type smallseotools.com in your browser address bar and that's it. You can use this tool to check and know who is copying your posts free for as many times as you want daily, monthly unlike Copyscape with 3 times monthly check limit. Keep your blogs broken links on check, get domain age of top blogs like MOZ, Ogbongeblog, Nairaland, shelaf, yomiprof etc. You can even use it to do a rough calculation of your AdSense earnings lols.

Below are a few of the services small seo tools offer to bloggers and the lots of wanna be bloggers out there.

Domain Age Checking
Plagiarism test
Back link checker
Alexa rank
Similar page checker
Adsense Calculator
Keyword Rich Domain
Domain Hosting checker
Website Keywords
Suggestions Tool
Suggestion
Broken Link Checker
Word Count Checker
Google Page Rank checker and lots more

You can visit them and start sniffing and peeping till your eyes starts itching. But while checking, be sure to gather enough information that will help you on your own journey to becoming a pro. Don't just peep for fun.

Friday 14 October 2016

6 Things That Determines How Much You Make From Your Blog

Today, it’s the dream of everybody to make money. It’s also the dream of everybody to make money doing nothing.

Majority think that working online and making money from it simply means making money without doing anything. That’s a fat lie! You can say it’s not as hard/tough as the conventional 8-5 hour offline work but certainly not the above. As you will agree with me that sitting or sleeping alone is work not to talk of sitting, thinking and writing. If you doubt, go sleep for 2 days wake and tell me how you feel.

 money from blog
Blogging is one of the online businesses been crowded by many as its assumed to portray the original do nothing and get paid syndrome. To some extent, that’s true. But if you mean business and want to take blogging to the next level, how much you make depends on the following given below.

6 Things That Determine How Much You Make Online Blogging!

==>1. You:
How much you make online blogging depends on you. It depends on how creative you are. Your thinking cap, how you write, how much energy, time you are willing to invest and how much of your blog you wish to monetize: less ads or ads every where which will actually get you the money but chase your readers in return. So in all, it first depends on you mind set.


==>2. Promotions/Exposure:
Most at times, what we bloggers do is to spend all the money we earn from our blog on gadgets, food, cloths and other things forgetting the fact that you need to promote your blog to get it across to a larger audience.

If you are the type that engage in such, am sorry my friend. As the more promotions you do, the more people will get to know your blog and as the saying goes, more traffic=more money for you.

==>3. Blog Niche
Sorry to say, but your blog niche matters a lot too. While tech bloggers can make huge money from adsense, affiliate, links, entertainment blog from direct adverts etc a travel blog wont. Why? 
Adsense CPC rate for travel/transport blogs are low. No affiliate marketing programe for travel blogs except you want to sell tickets. And to get enough traffic to run direct adverts on a travel blog, you need hard work and when I say hard work, I mean it.

==>4. Monetization Methods/Strategies:
How you monetize and the strategies used matters a lot. For example, a lot of bloggers out there get more traffic than mashable. But mashable makes more money than they do.

The method could be pay per click adverts, direct adverts, affiliate marketing, sponsored posts, music promotion etc But the strategies include how you implement them. As for google adsense under pay per click adverts, your income depends on how you position the ads.


==>5. Blog Visitors/Audience
If you monitize using google adsense ads, infolinks or any other pay per click site ads, then you will realize that who visits your blog actually matters. As clicks from U.S and UK will give you more money than those from Nigeria. This affects your over all earnings. Same happens in affiliate marketing. If your blog attracts more kids than adults, then you are doomed. As kids arefreaks not buyers! permit me!


==>6. Resources/Workforce:
Resources? Gadgets: Laptop, tablets, phones, data bundle, working environment, time etc. As for workforce, number of blogs matters too in boosting the amount you earn online. With more blogs, you can target different niche and earn steadily too.But you can’t do it alone or you’re die blogging. You need people with great mind set to join hands and do the work while you pay and smile to the bank in excess.

5 Steps To Insert AdSense Ads Any Where Inside Blogger Posts

Hello bloggers amidst, its time to get creative with your ads placement to enable you earn more with Adsense. Here I will show you guys how to manually insert AdSense ads: banners, link ads or whatever ads not necessary Google ads to any where inside your blogger blog posts (Top, middle, button, under image, above image, centre, left, right etc).

No HTML/Java script widget needed and doesn't require you to edit your blog template. As that can be complicating at times. The post was initially posted by Olarewaju Toby of Naijtech and later shared on Nairaland.
adsense-ads-anywhere-inside-posts
Pls kindly note that using this method is quite easy but can be tedious removing them in future if you happen to lose your AdSense account. As you will have to edit every post you've used it on or the codes will be left visible to your blog readers.

How To Place Ads In Between Blogger Posts

==>1. Log on to your Google Adsense dashboard and create an Ad unit. (Personally, I'll go for Link ads)

==>2. After that, copy the Ads code given, paste to a Notepad on PC and save! (Necessary for future use).

==>3. Now each time you write a blog post, just before publishing it. Decide a place you would like the Ads to appear (Top, middle, bottom or anywhere). After which you turn to HTML view at the top left corner. Locate that spot and paste the Ads code from notepad there.

==>4. Tweak/tune its position as desired then publish. I.e

  • To place Ads at the centre of your post, Add <center> </center> tag to the code E.g <center> Ads code Here </center>
  • To Place Ads Left, use <left> Ads code Here </left>
  • For Right use <right> Ads code Here </right>

==>5. Mission accomplished. Publish when done, visit page to see your ads staring at you.

NOTE:
While doing this, remember to limit the number of ads block (text or banner) to 3 per page. 

How to Turn your PC into a Wifi Hot spot using UC Web Broswer

Months back, we where all grazed with the sudden introduction of a pc version(.exe) of the best mobile browser ever - Ucweb. Which just like the mobile versions, comes packed with lots of interesting features that will always make other browsers feel ashamed of their developers.


Some of this features include:
==>Supports Multi File formats Download
==>Very simple and friendly user interface.
==>Very Clean and Easy to Operate
==>Virtual WiFi future.
==>Smooth and quick webpage loading process
==>Inbuilt Download manager and Video Player
==>Ability to Design your browser theme
==>It works excellent with low speed internet to high speed 3G and Internet DM and Wifi. With many more amazing, unique and inbuilt features.


For today, we will be concentrating on the free virtual wifi features that comes hidden with this new ucweb for pc version. That will send other softwares like connectify, pdanet which offer similar services packing in the nearest feature. And give it an edge to compete with other top browsers like Firefox and chrome for the spot of best browser on pc.


ucweb-WiFi-Hotspot
Ucweb WiFi router

What it Does/Can Be Used For?

Just like connectify on pc, you can use the desktop ucweb wifi features to connect other devices to browse and download from your pc data. Devices like Android, iphone, ipad blackberry other pc,  with wifi features can easily connect a browse directly from your pc 

But kindly note that for this to work, your pc must be the main source of the internet connection. That is ucweb cant share data to other devices if your laptop connected from another wifi hotspot. Meaning you actually have to be connected using a modem. This entirely slates the glo bis users out.

To locate the virtual wifi hotspot features, look at the top right corner of your ucweb for pc screen. Immediately after the search bar. Or see the image below.

How To Use it?

==>First Connect your pc to the internet using a usb modem.
                        You can get the latest 4G Modem Here for 3,000 ==>Download latest UCweb for PC Here.
==>Locate the WiFi router option at the top of your screen just after the search bar and turn it on.

==>Connect and start browsing with other wifi enabled devices. Its simple with No harsh setup needed.
Seriously i was amazed upon realizing this hidden features in ucweb. But It seems the thing doesn't work/show up on windows xp laptops. Downloaded it on quite a number of them but the feature was nowhere to be found. Apart from this, if you already have it installed but can't locate it, just uninstall and download the one above. Feel free to try it out and let me know what you think.

How To Build A Phone Power Bank Yourself From Damaged Laptop Batteries

Seriously am gonna give kudos to this dude on Nairaland. It never occurred to me that one can easily build a mighty home made mobile phone power bank from spoiled, old or damaged laptop batteries without assistance from a techy, technician of any sort.

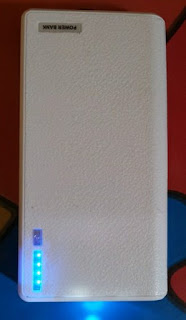
What Is A Power Bank?
Power banks are external batteries which are built to a certain capacity, meant for storing power for later use. Probably when you'll far from home or when there is an outage (trust Nigeria here).

In this post, you will learn in details how to build a power bank from damaged laptop batteries that you can use to charge your mobile phones, tablets as well as other hand held gadgets for hours or even days of power outage. So you save some cash and still never go out of power again.
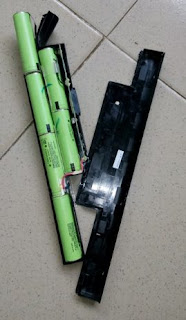
dismantled-old-laptop-battery
dismantled old laptop battery


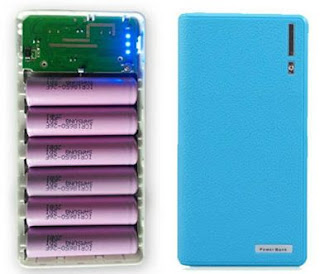
weld-less-18,650mAh-power-bank-case
weld-less 18,650mAh power bank case from Aliexpress.

Damaged Batteries? How Is That Possible?
I Know you maybe wondering how that is possible since the laptop battery is damaged already and can barely retain charge. It is possible because most times when your laptop battery gets bad or stops charging, it doesn't primarily mean the whole battery is dead. It maybe as a result of a broken circuit inside the battery or one or two of the cells inside is dead not all. Since we usually have 6 to 12 cells inside, you can pick out the damaged ones and reuse the rest for a power bank. Hope that was understandable?

Materials Needed/Requirements
==>1. Screw driver

==>2. Nose Pliers (optional for disassembling) 
==>3. Soldering Iron (optional for joining wires)
==>4. DIY Power bank Case from Aliexpress. Get it here (optional too)
==>5. Spoilt/worn out laptop batteries
==>6. Your Techy brain

Quick Note:
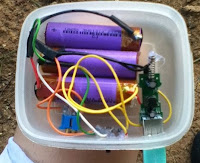
The power bank case you buy, depends on the number and size of the damaged laptop batteries or any other batteries you intend using. The one given above is 18,650mAh lion power bank case. feel free to search and choose the perfect size. Also you can chose to construct one yourself if you'd rather prefer not to import. Though you might need some technical know how to do so. The above is recommended, since it already contains a circuit housing the resistor, transistors, capacitors, etc that is meant to handle the current input and output voltage. A USB port to plug your phones to. So building that yourself could also result to you sacrificing portability.See photo of one a guy built below.

home-made-power-bank-case
home made power bank case 1
home-made-power-bank-case
home made power bank case 2

Procedure For Building

==>1. First, disassemble the laptop batteries you've got (see 1st image above). After which you separate the cells inside.

==2. Open the power bank case you bought and arrange the batteries inside accordingly.

==>3. If the laptop battery you have requires joining of wires, join them in a parallel connection (that is positive to positive and negative to negative). Then solder the wires together accordingly with soldering iron.

==>4. Couple and that's it. Charge and flex. But Pls Don't Sell without telling your buyer what's inside LOLs!

complete-power-bank
complete power bank


NOTE:
Power bank mAh/Capacity: Here we made use of parallel connection. Meaning the amount of the power bank mAh(milli Amp hour) is gotten by summing up the capacity (mAh) of the individual batteries you have. Thereby maintaining the same voltage. Lets assume in one laptop battery, like the one above: you have 6mini batteries of 4mAh each. Using parallel will give a total of 4+4+4+4+4+4=24mAh

To charge the power bank when low, you can make use of an original Android charger to recharge it

Finally, if you would rather prefer watching to reading the video below should teach you more.